Thursday, July 29, 2010

cute backpack alert!!

Update:  See a more complete tutorial here.

Our annual pool party is coming up, the one where the girls ask for school supplies for needy kids rather than gifts for themselves. This year, I've seen several blogs with tutorials for school bags, and I was inspired to make some myself, to go with our donation! This is the first, and I'm so pleased with how it turned out.

I modeled it after a couple of backpacks we have around here, where the drawstring from the top is attached to the bottom corners, forming the straps. They are very comfortable to wear and easy to deal with.

I had some old jeans lying around, and thought they would make a good, sturdy backpack. This one is made from one jeans leg cut open and laid flat, and one back pocket. Therefore, you could get two backpacks from one pair of jeans. I added wide casings at the top, made from a cotton dot print. The floral across the front is actually a big pocket, with a zipper at the top. The pocket is as wide as the whole front, so it can be sewn into the side seams for the edges. Then the pocket from the back of the jeans on top of that.
Below you can see the strap/drawstring; I took 3 lengths of nylon cord and braided the middle section for the drawstring. Then I tied a knot and braided the now 6 strands together for the remainder of the strap. Then I stitched it tightly into the side seam. You'll need one of these for each side, of course.
This one only has the front pockets, but you could easily add more on the inside. It could also be lined if you wish.

Here's what you'll need, if you'd like to make one:

A rectangle of denim, cut from a jeans leg, large enough for the front and back of your backpack. (It will be folded in half, and the fold line is the bottom of the backpack.)

One rectangle of fabric for the front pocket, as wide as the front portion of your backpack, and almost as long as the front portion only.

A back pocket from the jeans.

Two rectangles of fabric for the casings, about 6" x the width of the backpack.

Zipper, at least as long as the width of the backpack.

Nylon cord or other material for the drawstring/straps.

Order of assembly: (Be warned - this assumes some knowledge of sewing! Sorry these are so sketchy!!)

Turn under ends of casing pieces and hem.

Turn under top edge of large front pocket. Stitch to one side of zipper.

Stitch back pocket from jeans in the center of the large front pocket.

Turn under bottom edge of front pocket. Place the pocket on the end of your large denim rectangle that will be the front of the backpack, lining up the unstitched side of the zipper with the top edge of the denim. Stitch the lower edge of the pocket in place. Baste the unstitched side of the zipper to the denim.

Fold casing pieces in half and stitch to tops of backpack front and back. (Remember, since you hemmed the ends, it won't go all the way to the edge) Finish seam, flip up the casing and topstitch.

Braid the middle sections of the cords and run through the casings; tie a knot and continue braiding to the ends.

Stitch the side seams, securely catching the ends of the cords at the lower corners. Finish seams and turn.


Saturday, July 24, 2010

a tale of two squash vines

I've not said much about the garden this year, because really, there's not much to tell. I set everything out late, so it's taking a while to catch up. One thing I did do differently this year is to plant squash. Yes, I said I'd never do it again, but this year I discovered row cover. I thought this would work for the vine borer problem, but hand pollination was not working, and I was not consistent enough in going out and removing the covers for pollination by insects. So off the row covers went.
Naturally, now I have a few signs of vine borers, and I want to document it here just in case it might help someone. Above, you see a good, healthy squash vine - nice dark green vine and strong leaves. The one below, however, has vine borers. You can see the differences; wilted leaves, pale color, weak vine, and gold-colored stuff (called frass) coming out of holes in the vine. There's even a tiny squash that has rotted.
I've tried many methods to deal with these things, and I'm going to tell you the one that has been most effective, least invasive, and least disgusting for me. If you'll look carefully at the vine, you'll see a pin; take a nice, long pin and poke all the way through the vine, at and above the frass. Go farther than you think you really need to, because they do travel upward. Also get the places where the leaves and fruit branch off, because they crawl up into there too. This can be therapy for you, too - really take out your frustrations with that pin.

Once you've stabbed everywhere you think necessary, dig a trench under the vine and bury it. Tuck it in tight, give it a night-night kiss, and say a little prayer that it roots above the borer damage. If you'll check regularly for signs of borers and do this before the vines are too far gone, they have a better chance of survival.

Wednesday, July 21, 2010

while we're on the subject...

While we're on the subject of knitting, I just wanted to show you these adorable sets!! They are a collaborative effort between my friend Maya of Springtree Road, and Alecia of Madbird. Alecia makes the handy little bags, and Maya spins yarn to match. The set above is called Hedgie Love, and the one below is called Quills. I love the colors in Hedgie Love; but look at the little birds in Quills! And the little hedgehogs with scarves! So precious!

Anyway, there's only one set left in each of their shops! Find Hedgie Love here, and Quills here.

Monday, July 19, 2010

needle organizer

Recently my dear mama bought some sock yarn for me, and it's been calling for me to cast on! The only trouble is… um... i hate to say this, but... FINDING THE NEEDLES.

See, this is my needle organization system:
Yeeeeaaah. Takumi bamboo needles, rosewood DPNs, knit lites, vintage Susan Bates circulars, all stuffed in an old padded mailing envelope. And, well, other parts of the house as well. Turns the stomach.

So, I thought, while I fish out the necessary needles for my socks, I might as well bring some order to my needle stash. I took the circulars and DPNs and put them together by size in Ziploc quart-size bags. Since the others were a little too long for my bags, and have the sizes marked on them anyway, I put them in the other container. I also put all my crochet hooks in a Ziploc bag of their own. And it just so happened that I had a clear tote that fit the Ziploc bags perfectly!
Yes, one day I'll get around to making the Most Awesome Needle Organizer Ever. I have a plan for it, believe me. But until That Day, this will do nicely.

Sunday, July 18, 2010

what a week!

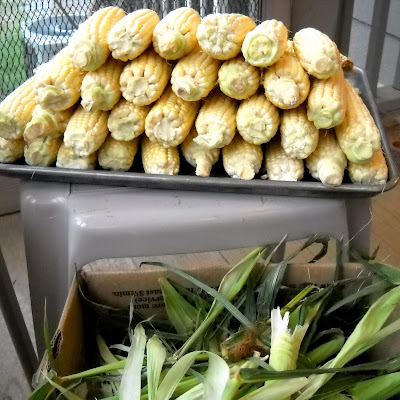
Oh my. What a week it's been. A good kind of crazy, but crazy nonetheless! Then late in the week, we were blessed with a bunch of peas, corn, blueberries and watermelons from a very generous family in our church. This happens quite a bit, so I'm getting better at food preservation, thankfully.

That led to scenes that remind me of my granny's front porch in the summer, and getting purple fingers from shelling purple-hull peas. It's a good thing that my girls were there to pitch in and help. (In case you're wondering about Lydia's outfit, she wanted to dress like Shine, one of the Wubb Girls from Wow Wow Wubbzy. ;) )
And the corn was my job:
There were also about 3 gallons of blueberries, but I didn't get a photo of them. I have the blueberry-stained hands to prove it, though, along with 10 jars of jelly, and the rest in the freezer.

Then to cap it all off, Saturday was Lizi's birthday. My baby is a teenager now! Where DOES the time go?

I guess it goes to weeks like this one, full of jobs to do and busy hands.

Tuesday, July 13, 2010

Monday, July 12, 2010

fun with textbooks!

Getting ready for the homeschool year is a very exciting time for us! This year, we were fortunate to find some of our homeschool curriculum used, at drastically reduced prices. The only problem with used curriculum is that sometimes it looks a little…. used. The math textbook seemed to be the worst, as the cover wasn't all that great looking even when it was new. Our solution was to make a cover, and I'll do my best to show you all the details in case you'd like to make one of your own.

We started with a pair of old jeans, a bit of clear vinyl for a pocket on the front, and one of the back jean pockets on the back. To make life easier, I just cut the whole pocket out with some of the surrounding fabric, intending for it to fray, and quickly stitched around the whole thing.
Here's our original textbook. Let's just say we hope it has a nice personality. ;)
Here's the cover, turned inside out. The outside cover is one piece of denim cut from the leg of the jeans, big enough to cover the whole book plus seam allowance. The inside covers are the green fabric - make sort of pockets the size of the inside covers of your book, plus seam allowance. The denim was too thick to try and tuck into the ends of the spine, so we just trimmed it and zigzagged across the top and bottom.
Here's the cover, turned right side out. Lizi will be able to put whatever she wants to display in the clear vinyl pocket on the front, and maybe a pencil in the back pocket.
And here's the inside of the cover, turned right side out.
Here's the process of putting the book into the cover.
Hope that makes sense! Looks much better now, we think. :)

Thursday, July 8, 2010

a new kind of shop!

My friend Maya recently opened a new shop using Big Cartel. I have to admit, I had heard the name, but was not very familiar with Big Cartel at all. Yesterday she posted a video showing how easy it is to buy from a Big Cartel shop; I am impressed. I'd just stick the video on here, but I don't know how to do that. So just go to her blog and see for yourself! ;)

Tuesday, July 6, 2010

my man

Today is our nineteenth wedding anniversary, so I wanted to show you a good photo of my man.
I searched through my photos, and in all the photos I have of him, he's doing… stuff… you know, holding chainsaws, putting up Christmas trees…
…backing me up on all my crazy adventures...
…but, maybe that's really the best representation of all.
You'll just have to take my word for it: he looks even better to me today than he did 19 years ago. :)
Happy Anniversary, darling! I love you!!!!!!!!

Thursday, July 1, 2010

so sad

We as a family very much enjoyed watching the Avatar series. We greatly anticipated the movie, The Last Airbender, which opened today. Despite the reviews, I really, truly wanted to like this movie. But… I didn't. It was agonizing. The action wasn't bad; if they had just stuck with that and not tried any dialogue, it would have been okay.

If you are a fan of the series and want to see the movie nonetheless:

1. Wait for DVD. Rent, don't buy.

2. If you absolutely must watch it at the theater, watch it in 2D. The 3D on this one made my eyes bother me all through the movie and hours after.

Sorry, that's the only advice I have to make it more bearable. Now I'm going to go find the entire series and watch it so maybe I can flush the memory of the movie out of my head.