Thursday, December 31, 2009

resolved

The past few years, I've not been one for new year's resolutions. It's the eventual breaking of the resolution that gets me; I'd just rather not set myself up for failure.

But this year, I have a resolution, although it seems like many because of the way it touches so many areas of my life. I want to, I need to, I must, be more intentional. To spend more time acting, not reacting; to spend more time nurturing my family and myself; to make time for learning; to push myself to create the way I know I can and should.

Part of this means a change in the way I spend my time in front of this screen. Less time checking stats and hits and posts and tweets, because, really, how does most of that help? Less time fretting and fussing over the Etsy shop, and more time making things my family and I can enjoy. Less time on the computer in general; but more meaningful, intentional time. I will continue blogging, because I think this is going to be an interesting year and I want to share it with you!

So best of wishes for you in this new year. May God bless you as you follow Him, and may we all have the will to follow through on what we have resolved.

Tuesday, December 29, 2009

hat pattern

Here's one of my favorite Christmas gifts - no, not the hat, the knitting needles! My dear, sweet husband went to an unfamiliar store and asked around to try to find a good Christmas surprise for a knitter. He's a keeper! The needles are bamboo, my first pair, and I really like them.

So that's how the hat project started - a new pair of needles I wanted to test out. My mother-in-law works with a program called Look Good Feel Better, and I wanted to make a chemo cap for them. I had some Serenity Chunky Weight yarn left over from my Wild Thing hat that I intended to use. But could I find a hat pattern, suitable for chemo patients, for two needles, size 11, and bulky yarn? Of course not. So I made up my own. And since I could not find such a pattern when I needed it, I thought I would share it here so that maybe someone else could use it.

Kim's Bulky Yarn Two-Needle Chemo Cap (for lack of a better title)

Size 11 needles, Serenity Chunky Weight yarn or other similar bulky weight yarn; small amount of worsted yarn, button, and size J crochet hook for flower; yarn sewing needle.

Gauge: 3 stitches and 4 rows to the inch in stockinette stitch

Cast on 63 stitches.

Rows 1-9 - work in seed stitch, *k1, p1* across.

Rows 10-21 - stockinette stitch (knit one row, purl one row)

Begin decreases:
Row 22: *knit 7, knit 2 together*, repeat across
Row 23: purl
Row 24: *knit 6, knit 2 together*, repeat across
Row 25: purl
Row 26: *knit 5, knit 2 together*, repeat across
Row 27: purl
Row 28: *knit 4, knit 2 together*, repeat across
Row 29: purl
Row 30: *knit 3, knit 2 together*, repeat across
Row 31: purl
Row 32: *knit 2, knit 2 together*, repeat across
Row 33: purl
Row 34: *knit 1, knit 2 together*, repeat across
Row 35: purl
Row 36: *knit 2 together*, repeat across

You should end up with 7 stitches. Break off your yarn, leaving a long tail for sewing. Thread the yarn through the remaining stitches and pull up tightly. Sew the seam and weave in ends.

For the flower, I use the flower in this pattern, omitting the felting and adding a button in the center. They are unreasonably fun to make. If you only knit and do not crochet, here are some knitted flowers you might use.

And of course, if you prefer knitting in the round without a seam, just switch the purl rows to knit rows. You'll also need to *p1, k1* on the even rows on the seed stitch portion to make it come out right (knit the purls, purl the knits).

Happy Knitting!

Note:  I am hearing from a few knitters that this hat has turned out short.  There is at least one reason for this:  It was first designed as a chemo cap, and therefore needed to be a bit small.  Chemo patients do not have the bulk of hair to fill out a cap.  So by all means, if you have hair, and if it looks short to you, work a few more rows before beginning the decreases!

Also, different types of yarn will have a different gauge on the rows per inch, so if you use a different yarn you may want to account for that as well.

Friday, December 25, 2009

Merry Christmas!

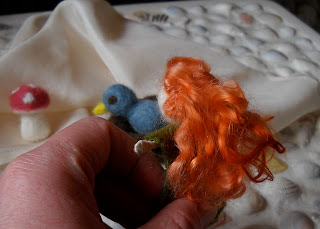
I didn't do a whole lot of hand-making for the girls' gifts this year, but I did want to share this one with you. It's mostly needle felted, for Lydia.

Needle felting is rather mindless, so it's easy to make up stories about the things you're making. This little girl has a wool felt dress, with a flower embroidered on the front. She has wild curly auburn locks. I'd imagine she often runs out in the morning to pick flowers before her mom has a chance to brush her hair.
Lydia says "Maybe it's me!" So maybe it is.
This is her friend, Birdie. She goes out to visit Birdie when she picks flowers, and maybe brings her a worm or a bug when she finds one.
And she loves to find mushrooms along the way, especially the ones with red caps. The snails eat them, which makes the white polka dots on top.
She also has a little playsilk - will it be a bed, or a picnic blanket, or a tent? Only Lydia knows for sure.

Anyway, that's my folly for the day. Merry Christmas to you all, and I hope it's a blessed day for you!

Thursday, December 24, 2009

merry Christmas eve!

Our Christmas gatherings with family have already begun, so it's been a fun day for us. I'm busy this evening working on a last-minute gift for my smaller one. I can't wait to show you - such cute needle felty goodness!

Until then, I leave you with this bit of cuteness, sweet little gnome paper toys from Fantastic Toys! (found via The Crafty Crow.)

Tuesday, December 22, 2009

headwear how-to

Today's quick kids' gift is actually three - the construction is so similar, I decided to lump them all together. There's a superhero mask, a crown, and a pirate eye patch. As always, read through the instructions to the end before you begin! I show the project on the sewing machine, but this could be done by hand sewing. You'll need some pieces of felt and elastic, a fabric marking pen or chalk, and of course thread.
And here's your pattern, to print. Since the size is rather critical on this project, I've included a 1" square on the page so you can make sure it's the right size.
This project is easily made reversible, as each is two layers of felt. Just use different colors for the front and back, and it's like having two of each! Layer your two pieces of felt (wrong sides together, if it has a right and wrong side) and pin on the pattern. Also pin the fabric together outside of the pattern area. Trace around the patterns using your favorite fabric marking implement. Don't cut it out yet!
Remove the patterns, but not the pins holding the two layers of felt together. Stitch just inside the lines you've drawn, as they are your cutting lines. Leave a gap in the stitching at the areas marked "leave open" on the pattern. This is where your elastic will go.
It should look about like this after stitching:
Now we cut. Trim on the drawn lines, being careful not to cut your stitching. Also cut on the lines at the spots you left open for the elastic.
Now measure and tuck your elastic into the openings. Ideally, you should try it on the child; but if it's a surprise, you can't do that. Bev's Country Cottage has an excellent reference page with all sorts of measurements that should help. Remember that elastic needs to be a bit smaller than the actual head measurement to fit well.

A note if you are using elastic cord for any of these, such as shown on the eye patch: since even when you knot and stitch this stuff, it tends to pop out, I recommend you run the cord all the way through the piece, tie the two ends of the cord together with a square knot, and pull the knot back into the center of the felt piece to hide it. You can see the knot in the cord of the eye patch in the photo below, before it was pulled inside. And a tip - sometimes when we buy shoes, they are attached together with elastic cord - always save it! I use that for projects like this.

For small children: To reduce the possibility of strangulation, you may wish to cut the elastic, apply a bit of hook and loop fastener such as Velcro to the cut ends, and use that to fasten the elastic back together. The fastener should give way under pressure.
Once you have the elastic cut to the proper length and tucked into the openings, take it to the sewing machine and stitch back and forth over the opening to secure the elastic.
And done!
And here's the reverse side:
Feel free to embellish as you like, especially the crown!

Monday, December 21, 2009

"market bag" for fun fruit toys

As promised, here's a little "market bag" for the fruit. You can also use these principles to make a tote bag of any size you like. As always, read all the way through the instructions before you begin.

To start, you'll need 2 pieces of fabric 9" wide and 11" high. Cut a 1" square away from each of the bottom corners. For handles, you will need 2 pieces 3" wide and 14" long. You could use ribbon or trim for the handles instead, if you would rather.
To prepare the handles, fold in half and press a crease. Unfold and place the long raw edges inside the crease you just pressed.
Press again. You should now have 14" long, 3/4" wide pieces, the long raw edges enclosed.
Topstitch along both sides of your handle pieces.
Once your handles are ready, let's start on the bag pieces. Turn down 2" at the top and press. Then tuck the raw edge into the crease you just made, similar to the way we just did handle. Press. This gives you a 1" hem at the top.
Unfold the hem you just pressed, and stitch the bottom and sides of your bag using a 1/2" seam allowance. Ignore that 1" square cut out of the corners for now. Finish your seams. (Hint: if you cut out the bag with pinking shears in the beginning, your seam finishing is done!) At this point, your bag parts should look about like this:
Re-fold the hem you pressed in the top of the bag. Tuck the ends of the handles into the hem, a scant 2" from the seams. This will hide the raw ends.
Hem the top of the bag, being sure to catch all the handle ends.
Now run another line of stitching at the very top of the bag. Flip the handle up into place, and stitch back and forth over the handles as you come to them.
Now we address those funny cutouts at the bottom corners. Pinch one up and match the bottom seam to the side seam.
Stitch across using the same 1/2" seam allowance. Repeat for the other bottom corner, and finish the seams.
This will help your bag sit up when it's full. Your bag should now look about like this:
Press as necessary, turn right side out, and you're done!
For the patterns and instructions for the fruit, click here.

and the winners are...

First of all, let me say that I did not account for the downside of this giveaway. I have 2 crayon wallets to give away, and 22 people who entered, so that means at least 20 children I will not be sending a crayon wallet, plus siblings! That just hurts my heart, people! If I could send one to each and every one, believe me, I would. Thank you all so much for entering and for all your efforts to get the word out - this has been fun, and I believe I shall do it again!

For those who requested that I put some in the Etsy shop: I did stop selling children's items because of the CPSIA; it just became a hassle with all the record keeping and labeling. If you are unfamiliar with CPSIA, I would encourage you to learn more about it from my links there on the right, and then contact your congressmen on behalf of small businesses who are struggling to comply with this ill-written piece of legislation. However, it's been so much fun to make these, I may consider selling some in the near future, even with the CPSIA issues. In the meantime, there are many other Etsy sellers who make them, just do a search for "crayon wallets".

So let's get down to it. This morning we did a drawing the low-tech way (which is how I do most things). I wrote down each entrant on a little paper, plus an extra for each tweet, facebook or blog post. And the winners are:


So congrats, and I'll be mailing your crayon wallets today!

Later today I'll be posting the tutorial for the bag to go with the "fun fruit". Yay!

Sunday, December 20, 2009

fun fruit

As promised, here's another gift-y type thing you can make for your favorite child. Stuffed toy food is big in the world of handmade right now. Here's 4 pieces of fruit, very simple to make. Yes, I know you're smart and could figure this out on your own. Now you don't have to do that.

Here's your patterns, to print out:

You'll need odds and ends of fabrics, and a little felt or ribbon if you want leaves and stems on your fruit.
Cut 2 of each fruit shape out of the appropriate color fabrics. Cut one grape leaf from green felt. Use either felt or bits of ribbon to make the stem and leaf on the apple. (I didn't give you a pattern for that - it's just a rectangle and a leaf shape. You can handle it.) I like to stitch around the edges of the felt to make it a bit stronger, before attaching it to the other fabrics. Of course, the leaves are completely optional, if you'd rather leave them off.
Stitch the leaves to the tops of the apple and grapes.
Now stitch around the fruit pieces, right sides together, with a small seam allowance - about 1/4". Careful not to catch the grape leaf in the seam! Leave an opening for turning in a spot that will be easy to handstitch later - the top of the grapes, side of the apple, banana and orange. Then stitch around them again for good measure, especially if you expect them to get hard wear or if the fabric is loosely woven. When the sewing is done, clip the inward curves and points.
Turn, using a chop stick or something to help get the nooks and crannies out:
Stuff, and hand stitch the openings closed.
And done! Next I'll show you a "market bag" for the fruit, but you can use the principle to make any kind of tote bag.
Don't forget the crayon wallet giveaway - we draw in the morning!

For the simple "market bag" to hold the fruit, see the next post, or click here.

Saturday, December 19, 2009

star wand


Over the next few days, I've planned to post some quick, easy projects that might be made for stocking stuffers or small gifts for children. Today's project is a wand, or whatever you'd like to call it. You can vary the colors, of course, and you could even use different shapes. Hearts would be really cute, I think.

As with all projects, I recommend you read all the way through the instructions before you begin.

If you'd like to use stars, here's a pattern you can print - just click on it and hopefully it will turn out full size. My stars are a little wonky, so if you have a star template you like better, feel free to use yours.

You will also need: felt in your chosen colors - I've used sky blue, purple, and sparkly white; 4 24" pieces of ribbon to coordinate with your felt colors; a 12" length of dowel, mine is 3/16"; and your glue of choice. You'll also need thread, and a sewing machine if you choose. But I think it would be fine hand-sewn, or even glued in a pinch.
Cut 2 big stars, one from each of your chosen colors. Cut 2 small stars of the sparkly white. That's 4 stars in all.

Place the white stars in the centers of the colored stars. Take two pieces of ribbon for one side of your wand and fold in half. Tuck the fold between a white star and colored star and pin, making sure the ribbon streamers come out at the spot marked "dowel" on the pattern. Repeat for the other side.
It should come out looking about like this. At this point, you might want to test and make sure your colored stars are going to line up well when you put them wrong sides together, and adjust if needed.
Now we sew. Topstitch around the edges of the white star. If you start at the lower right point, and end at the lower left point, then that's two lines of stitching across your ribbon to hold it more securely. Repeat for the other side.
When the stitching around the white stars is done, place the two sides wrong sides together, making sure to line up the ribbons.
Now you will topstitch around the edges of the colored stars, being careful to catch them both. Leave an opening large enough for the dowel at the spot marked "dowel" on the pattern. And be sure to hold the ribbons out of the way!
When the sewing is done, test fit to make sure the hole at the bottom is large enough for your dowel. Once you are sure it will fit, put a layer of glue on the end of the dowel and wiggle it into the opening, pushing the dowel all the way to the top point of the star.
And once it dries, you're done! Cute, huh?
I would also remind you of the little Christmas stocking tutorial from last year.

And don't forget the crayon wallet giveaway! As of this posting, there's still time to enter!